Domain SearchInstantly check and register your perfect .pk or international domain
 Web HostingGet a .pk domain for as low as PKR 467
 cPanel HostingUser-friendly hosting powered by cPanel
 Reseller HostingLaunch your own hosting business with minimal technical requirements
 Windows HostingOptimized for Windows-based applications and websites
 Affiliate ProgramEarn referral commissions by promoting our services
 WordPress HostingFast & Reliable WordPress Hosting
 Domain TransferMigrate your existing domain seamlessly with zero downtime.
 All DomainsAccess 324+ top-level domains (TLDs) worldwide from a single platform
 Whois LookupIdentify the owner of any domain using our whois and rdap lookup tool
 Managed VPS Hosting
 AI Website BuilderCreate beautiful websites effortlessly using intuitive drag-and-drop features
 Online ShopLaunch a professional online shop with no technical skills required
 BlogDiscover expert guides on hosting, websites, SEO, and digital growth strategies
 ContactGet instant assistance via live chat or email
 SupportAccess help articles, tutorials, and service documentation
 SSL CertificatesEncrypt data, build trust, and boost SEO.
Getting an HTML website live is fast and straightforward once your files and hosting are ready.
You can have your site online in under 10 minutes.
This guide walks you through how to host HTML website in cPanel: from preparing your files to testing the live URL.
A plain HTML site loads fast and needs no database, which is why so many landing pages, portfolios, and small business sites still run this way. You just need the right hosting setup underneath it.
A static HTML site has one big advantage: there’s nothing to break. No database, no plugins, no updates to run.
That’s also why hosting setup is more important than people expect; a missed step in File Manager is usually the only thing standing between your files and a working website.
What you need before starting:
- A complete HTML project on your computer, with
index.htmlas the main file - All supporting folders (
css,js,images,assets, etc.) - A domain name and a cPanel hosting account, available at Truehost.
Affordable hosting plans and .pk / .com domains are available at truehost.pk. You don’t need advanced technical skills to get started.
What you’ll learn:
- How to prepare and upload an HTML website in cPanel
- How to use File Manager to upload and extract files
- How to place files so the site loads at yourdomain.com, not a subfolder
- Common mistakes to avoid, and how to test your live site
Let’s get your HTML site online.s.
Step-by-Step Guide on Hosting an HTML Website in cPanel
Follow these steps in order. Each one builds on the last. Keep your browser open to cPanel and your project files ready on your computer.
Step 1: Prepare Your Files
Organise your project folder properly before you touch cPanel.
Here’s a clean example structure:
my-website/
├── index.html
├── css/
│   └── style.css
├── js/
│   └── main.js
└── images/
    └── logo.png
Open index.html in your browser first, right from your computer. Confirm the styling and scripts load correctly before you upload anything.
While you’re checking locally, open the page in more than one browser, Chrome and Firefox, at minimum. Fonts, spacing, and JavaScript behaviour can differ slightly between browsers, and it’s easier to fix on your own computer than after upload.
If your project uses any relative file paths (like ../images/logo.png), double-check they still work once the whole folder is zipped. Paths that work in your code editor don’t always match how cPanel unpacks the archive.
This small check saves you a lot of guessing later. If something’s broken locally, it will still be broken once it’s live.
Zip the entire folder, not just index.html.
Why zip? It’s faster. It’s more reliable. It reduces the chance of missing a file during upload.
On Windows: right-click the folder, then select “Send to” → “Compressed (zipped) folder.”
On Mac: right-click the folder, then select “Compress.”
Either way, you end up with one .zip file ready to upload.
Step 2: Log In to cPanel
Access via yourdomain.com/cpanel or through the Truehost client area.
Enter the username and password from your welcome email. Once inside cPanel, find the Files section. Click File Manager.
File Manager opens a browser-based view of your server files. It works like the file explorer on your computer.
Step 3: Go to the public_html Folder
Click public_html in the left sidebar.
This is the web root. Anything placed here is publicly accessible. Visitors see these files when they type your domain.
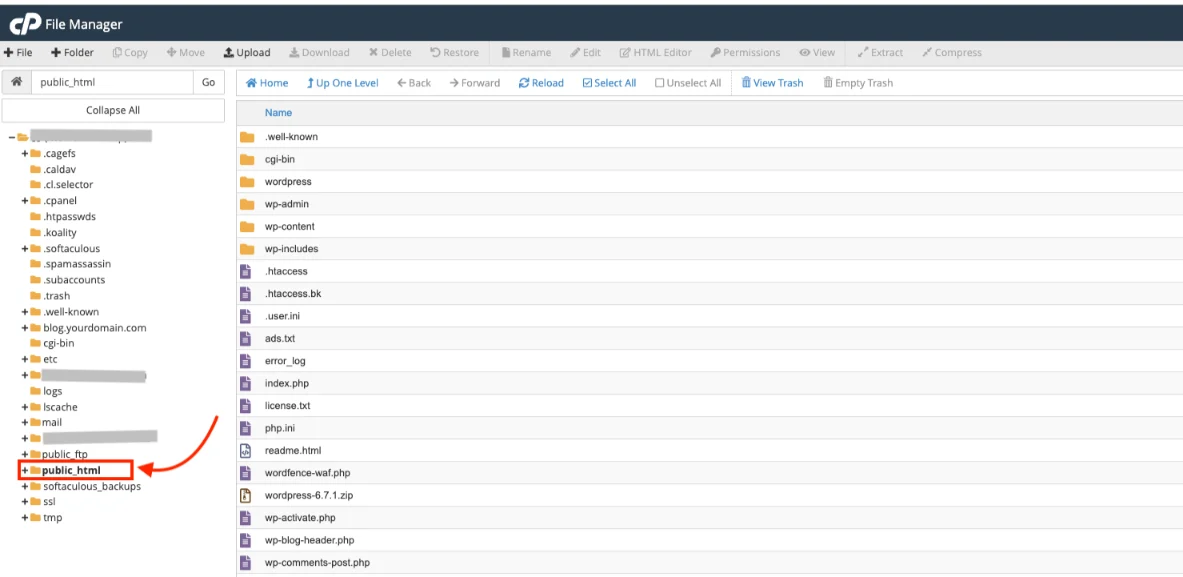
Files outside public_html stay private. Keep that in mind if you ever store backups or scripts on the same account.
If your account hosts more than one domain, each addon domain usually gets its own subfolder inside public_html. Make sure you’re working in the right one before you upload.
Step 4: Upload the Zip File
Click Upload in the File Manager toolbar.
A new tab or window opens. Drag and drop your zip file or click Select File and choose it from your computer.
Wait for 100% completion before proceeding. Partial uploads cause broken files and missing assets.
Docker as an alternative for developers who prefer a code-based deploy
Return to public_html after the upload finishes. Refresh the File Manager if the zip does not appear right away.
Step 5: Extract the Zip File
Right-click the uploaded zip file and select Extract.
Confirm the destination is /public_html/ and extract.
cPanel unpacks every file and folder from the archive. Extraction usually takes only a few seconds for a typical HTML site.
Do not close the window until you see the success message.
Step 6: Move Files to the Root
After extraction, files usually sit inside a subfolder (e.g., public_html/my-website/).
This causes the site to load only at yourdomain.com/my-website/ instead of the root.
How to fix:
- Open the new folder
- Select all files and folders
- Move them to /public_html/
- Confirm index.html, css, js, images now sit directly in public_html
Use the checkbox at the top to select everything. Right-click and choose Move. Clear any extra folder name from the destination path so it reads only /public_html/.
After the move, the site loads at the clean domain root.
Step 7: Clean Up
Delete the original zip file.
Delete the empty extraction folder if it remains.
Your final structure should look like this:
public_html/
├── index.html
├── css/
├── js/
└── images/
Clean and simple. Nothing extra sitting in the root.
A tidy public_html also makes future updates easier. You’ll know what belongs there the next time you edit the site.
Step 8: Test Your Website
You’re almost done. Now confirm everything works.
Activate Free SSL (recommended):
- In cPanel, go to Security → SSL/TLS Certificates
- Install or generate a certificate for your domain
- Wait a few minutes for the certificate to activate
If you don’t see an option to issue a certificate, check your Truehost client area or contact support, most Truehost cPanel plans issue free SSL automatically on new domains, so it may already be active.
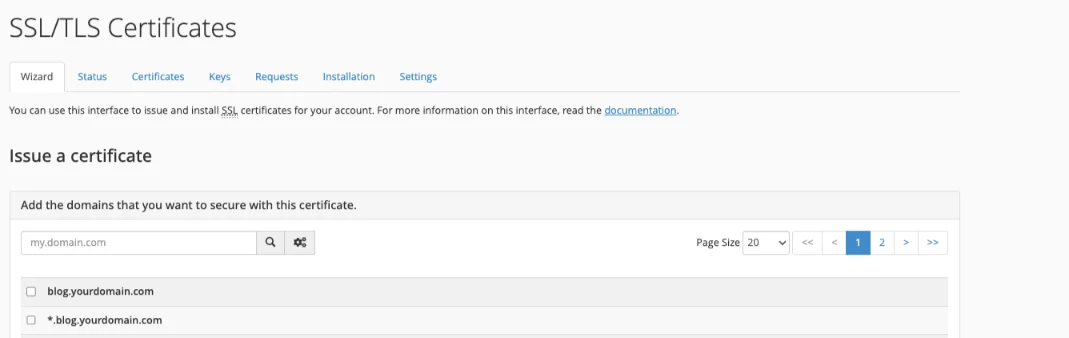
SSL is more important than most beginners realise. Cloudflare Radar data shows 98.6% of human web traffic was HTTPS in 2026, up from 98.03% a year earlier. Visitors and Google now expect it by default.
Test the live site:
- Visit your domain (force HTTPS) in a new browser tab
- Confirm the padlock icon appears
- Check that the site loads without mixed-content warnings
Mixed-content warnings usually mean one file, often an image or a script, is still being called over plain HTTP. Check your code for any hardcoded http:// links and switch them to https:// or relative paths.
Troubleshooting tips:
- Clear browser cache or use incognito/private mode
- Wait 1–2 minutes (especially for newly pointed domains or after SSL activation)
- Check that CSS/JS/images folders are at the same level as index.html
- If the site still fails, check file permissions (see Common Mistakes)
Your HTML site should now load cleanly at https://yourdomain.com.
Common Mistakes to Avoid
Most HTML hosting problems trace back to one of these mistakes.
- Deleting or forgetting CSS and JS folders. Your site loads, but it looks unstyled and stops working properly.
- Uploading files one by one instead of using a zip. Slower, and easy to miss a file.
- Leaving index.html inside a subfolder. This causes a 403 Forbidden error or an exposed directory listing.
- Leaving the upload page before it hits 100%. You end up with a corrupted or partial zip file.
- Forgetting to back up before making changes. If you’re replacing an existing site, download a copy of the current
public_htmlfolder first. Undoing a bad upload is far easier with a backup on hand.
Incorrect file/folder permissions (very common real-world failure):
This one trips up even experienced users.
- Files should be set to
644 - Folders should be set to
755
To fix this in File Manager: select the file or folder, click Change Permissions, set the correct numbers, then confirm.
Wrong permissions are one of the most common causes of 403 Forbidden errors and missing styles or scripts, even when every file is uploaded correctly. If you’ve checked every other item on this list and the site still won’t load properly, permissions are usually the culprit.
If your site outgrows a simple HTML setup – say you add a booking form, a CMS, or heavier traffic – you can scale up to VPS hosting or a dedicated server with us at Truehost without starting your hosting search over.
Get Hosting from the Most Reliable Provider
You now know how to host HTML website in cPanel from start to finish. Prepare the zip, upload through File Manager, extract and move files to the root, clean up, activate free SSL, and test. Avoid the common permission and folder mistakes, and your site will load cleanly at the domain root.
Now that your HTML site is live, your hosting provider is more important than you might think. A slow or unreliable host undoes all the work you just put into setting things up correctly.
Get your domain and hosting with Truehost.
Here’s what we offer for the Pakistan market:
- Fast, reliable cPanel hosting
- Pakistan’s cheapest domains
- Affordable renewal prices, no bait-and-switch pricing
- PKR pricing, so there’s no currency guesswork
- Free SSL and daily backups included
- 24/7 support when something doesn’t go to plan
If your project grows beyond a static HTML site, into automation, AI-powered workflows, or higher traffic, we also run VPS hosting, dedicated servers, OpenClaw hosting, AI Workers, and n8n hosting.
You can move up without switching providers or migrating your domain elsewhere.
We at Truehost make the process simple so you can focus on your content instead of server details.
How to Host HTML Website in cPanel FAQs
How to edit HTML in cPanel?
Open File Manager and go to public_html. Right-click the .html file and choose Edit or HTML Editor. Make your changes and click Save Changes. The updates appear on the live site immediately after a browser refresh.
How to secure a website on cPanel?
Run AutoSSL under SSL/TLS Status to install a free Let’s Encrypt certificate. Force HTTPS redirect in the Domains section. Keep file permissions at 644 for files and 755 for folders. Daily backups on Truehost plans add an extra safety layer.
Is cPanel hosting good for beginners?
Yes. The visual interface lets you upload files, create emails, and manage domains without command-line knowledge. File Manager, AutoSSL, and one-click tools make the learning curve short. Most beginners publish their first HTML site in a single sitting.
What are the disadvantages of cPanel?
It can feel resource-heavy on very small servers. The interface shows many icons, which may overwhelm some new users at first. Licensing costs exist for hosts, though shared plans absorb them. For pure HTML sites the benefits outweigh these points for the vast majority of users.