 Domain SearchInstantly check and register your perfect .pk or international domain
 Web HostingGet a .pk domain for as low as PKR 467
 cPanel HostingUser-friendly hosting powered by cPanel
 Reseller HostingLaunch your own hosting business with minimal technical requirements
 Windows HostingOptimized for Windows-based applications and websites
 Affiliate ProgramEarn referral commissions by promoting our services
 WordPress HostingFast & Reliable WordPress Hosting
 Domain TransferMigrate your existing domain seamlessly with zero downtime.
 All DomainsAccess 324+ top-level domains (TLDs) worldwide from a single platform
 Whois LookupIdentify the owner of any domain using our whois and rdap lookup tool
 Managed VPS Hosting
 AI Website BuilderCreate beautiful websites effortlessly using intuitive drag-and-drop features
 Online ShopLaunch a professional online shop with no technical skills required
 BlogDiscover expert guides on hosting, websites, SEO, and digital growth strategies
 ContactGet instant assistance via live chat or email
 SupportAccess help articles, tutorials, and service documentation
 SSL CertificatesEncrypt data, build trust, and boost SEO.

CyberPanel is a free hosting control panel built on OpenLiteSpeed. It offers fast page delivery, low resource use, free SSL through Let’s Encrypt, and simple WordPress management, all without a licensing fee. That makes it a popular destination for site owners leaving paid panels such as cPanel.
This guide covers the three main routes to CyberPanel: from cPanel, from another CyberPanel server, and from any other panel.
Before You Begin
Get these things in place before you move anything.
Server setup
- Use a fresh VPS or dedicated server running a supported operating system, with enough RAM and disk space for your sites. Install CyberPanel with its official installer on a clean OS, not on a server that already runs other software.
- Note the new server’s IP address.
- Make sure the ports you need are open: 80 (HTTP), 443 (HTTPS), and 8090 (the CyberPanel dashboard). You’ll also need port 22 for SSH, plus mail ports if you’ll host email.
- Have root or SSH access and an SFTP client ready.
Backup and planning
- Take a full backup of files, databases, and emails before moving anything.
- Make an inventory of every domain, subdomain, database, mailbox, cron job, SSL certificate, and custom setting. Delete, or “Check the list against the old server when you finish.
- Lower your domain’s DNS TTL (for example, to 300 seconds) a day or two ahead, so the final switch takes effect quickly.
- Schedule the cutover for a low-traffic period.
Safe testing
- Test the site on the new server before changing DNS. A temporary subdomain works, or you can edit your computer’s hosts file to point the domain at the new IP.
- Keep the old site live until the new one is fully verified.
- Use SFTP or SSH for every transfer, and use strong passwords.
Method 1: Migrate from cPanel
CyberPanel has an importer that can restore full cPanel backups, including website files, databases, and supported account settings.
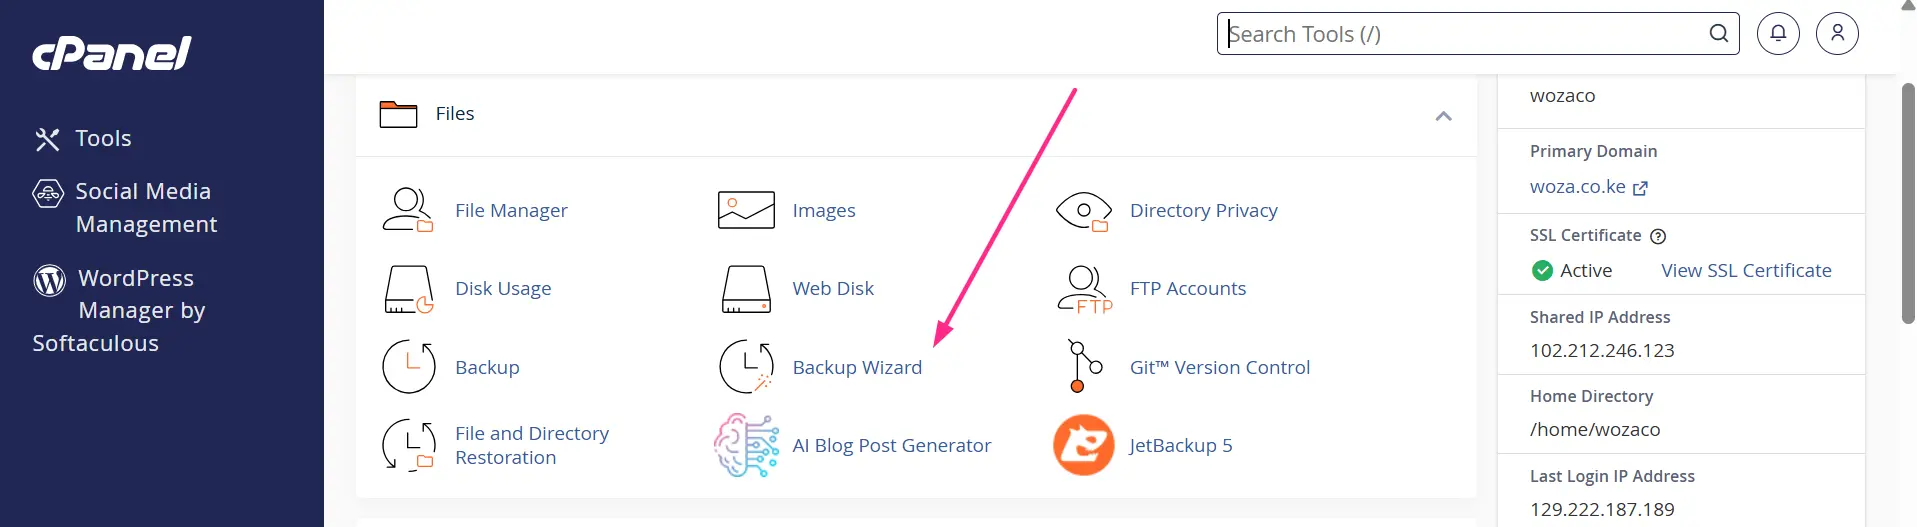
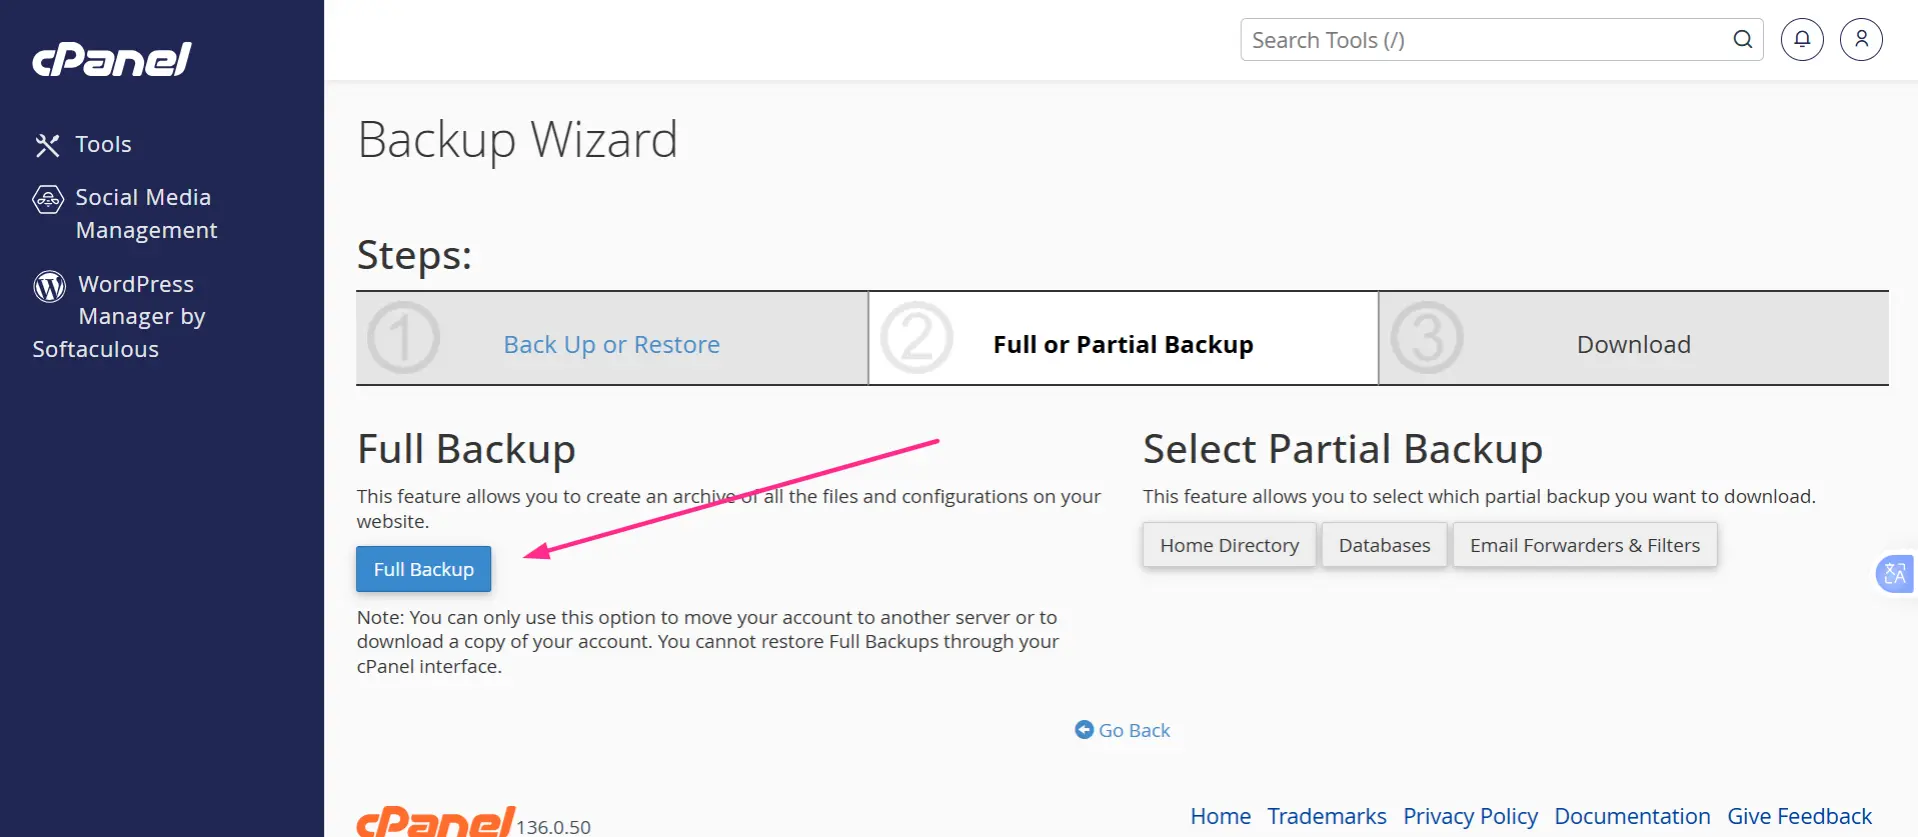
i) Create full backups. In cPanel, open Backup Wizard → Full Backup. Generate and download the .tar.gz backup for each account you want to migrate.
ii) Upload the backups. Use SFTP or SCP to transfer all backup files to a folder on the CyberPanel server, such as /home/backup.
iii) Run the importer. Connect to the new server through SSH as root and run this command:
/usr/local/CyberCP/bin/python /usr/local/CyberCP/plogical/cPanelImporter.py --path /home/backupMake sure /home/backup points to the folder containing your cPanel backup files, not to a single file. CyberPanel will import the backups from that folder.
iv) Check the logs. Note the log file location shown when the importer starts. If an import fails, use this command to find errors:
grep "Failed" /path/to/logReplace /path/to/log with the actual log file path.
v) Test each website. Open every site to confirm it works correctly. Check that the PHP version is correct and that file ownership and permissions are properly set.
Limitation: Some accounts with multiple addon domains may not migrate completely. If a domain is missing, create it in CyberPanel, then transfer its files and database manually using Method 3.
Method 2: Migrate from Another CyberPanel Server
Remote Transfer moves websites directly between two CyberPanel servers
1) Enable remote access. On the old server, enable the API access required for remote transfers.
2) Open Remote Backups. On the new server, go to Backups → Remote Backups.
3) Connect to the old server. Enter its IP address and CyberPanel administrator credentials, then retrieve the available account list.
4) Select the websites. Choose the sites you want to migrate and start the transfer.
5) Monitor and test. Check the transfer progress, then visit each website to confirm that it works correctly.
If a migrated website displays a database connection error, check the database credentials. You may need to reset the database user’s password and update it in the website’s configuration file.
If Remote Transfer fails, create backups on the old server and restore them on the new one. You can also transfer files and databases manually using tools such as rsync and scp.
Method 3: Migrate from Other Control Panels
If your current hosting uses hPanel, Plesk, DirectAdmin, or another panel without a compatible importer, you can move the website manually.
1) Create the website. Add the domain in CyberPanel and select the appropriate PHP version.
2) Create a database. Under Databases, create a new database and database user. Keep the credentials for the next steps.
3) Transfer website files. Copy the files from the old server to the website’s public_html directory using SFTP, SCP, or rsync.
4) Export and import the database. Export the old database as a .sql file and import it into the new database through phpMyAdmin. For large databases, use the MySQL command-line client to avoid phpMyAdmin’s upload limits.
5) Update configuration files. Replace the old database name, username, and password with the new credentials. For WordPress, update these values in wp-config.php.
6) Move email accounts if necessary. Recreate the mailboxes in CyberPanel and transfer existing messages separately using an IMAP synchronization tool. Email migration may require extra work because mailbox data and settings do not always transfer with website files.
7) Check the remaining settings. Reconfigure cron jobs, SSL certificates, redirects, and rewrite rules. OpenLiteSpeed supports many .htaccess rewrite rules, but some Apache directives behave differently. Test your website’s URLs and redirects to catch any issues.
Before completing the migration, test the website on the new server and Test the site on the new server, then update DNS. Once everything is ready, update the domain’s DNS records to point to the new server.
After Migration
Once your files and databases are on the new server, the work isn’t finished. Most post-migration problems come from skipped checks, so go through these steps in order.
i) Before You Switch DNS
Test everything on the new server. Use a temporary subdomain or your computer’s hosts file to view the site on the new server while visitors still see the old one. Log in, submit forms, upload a file, browse image-heavy pages, and send a test email. Check the database too: recent posts, orders, or user accounts should all be present.
Confirm the PHP version and extensions. Compare the new server’s PHP version with what the site ran before, since a mismatch is a common cause of white screens and fatal errors. Make sure required extensions (such as mysqli, gd, curl, mbstring, or imagick) are enabled. You can change the version per site in CyberPanel.
ii) Switching Over
Update your DNS. Point the domain’s A record to the new server’s IP address. Because you lowered the TTL beforehand, the change should reach most visitors within minutes to a few hours. Learn more about how DNS works if propagation delays are new to you.
Issue SSL and force HTTPS. Wait until DNS resolves to the new server, then issue the certificate in CyberPanel. Let’s Encrypt validates the domain over the internet, so it fails while the domain still points to the old server. After issuing the certificate, redirect all HTTP traffic to HTTPS and check for mixed-content warnings.
iii) Site-Specific Checks
WordPress. Re-save your permalinks under Settings → Permalinks to regenerate rewrite rules, clear every cache layer, and confirm that internal links and image URLs point to the right domain. If you used a temporary domain for testing, search for leftover references to it.
Email. Add SPF, DKIM, and DMARC records for the domain. These prove your messages are legitimate, and without them mail from the new server is more likely to land in spam. Send a test to a Gmail or Outlook address and check that it arrives in the inbox.
iv) Backups and the Old Server
Set up scheduled backups. Configure automatic backups in CyberPanel straight away, and send them to a remote destination such as another server or cloud storage. A backup stored on the same server is lost along with it if the disk fails.
Keep the old server running for 48 to 72 hours. Some visitors and mail servers will still reach the old address while DNS finishes propagating, and anything delivered there can still be recovered. Once traffic and email have fully moved over and you’ve confirmed a final backup, you can safely shut it down.
Common Migration Problems
| Problem | What to check |
| Import fails | The backup file’s integrity, the folder path, free disk space, and the importer’s log |
| Database error | Database name, username, password, and user permissions |
| Permission errors | File ownership and permissions. Files should belong to the site’s CyberPanel user |
| Missing email | Recreate the mailboxes, then move the messages separately |
| SSL fails to issue | DNS must already point to the new server |
| Slow website | PHP settings, caching (such as LiteSpeed Cache for WordPress), and server resources |
| Missing domains or data | Move the missing files and databases manually |
Get Started with Truehost VPS Hosting
CyberPanel needs root access and enough resources to run imports. On shared hosting, large imports can stall and databases can time out. A VPS avoids both problems.
Here is what a Truehost VPS gives you for a CyberPanel migration:
- Full root access. CyberPanel’s installer, the cPanel importer, and tools like rsync all need root. You can run each step yourself without waiting on support.
- Dedicated resources. Your RAM, CPU, and storage aren’t shared with other accounts. That keeps large imports from failing midway and keeps OpenLiteSpeed fast when traffic spikes.
- Easy to upgrade. You can host several sites on one server, and as traffic builds, you can move to a larger plan without migrating again.
- Fresh install. Start from a fresh operating system, install CyberPanel, and test everything before touching DNS. Your old site stays live the whole time.
Moving from cPanel to save on licensing fees or bringing several websites together on one server is easier with a VPS that has enough resources to run everything smoothly.