Domain SearchInstantly check and register your perfect .pk or international domain
 Web HostingGet a .pk domain for as low as PKR 467
 cPanel HostingUser-friendly hosting powered by cPanel
 Reseller HostingLaunch your own hosting business with minimal technical requirements
 Windows HostingOptimized for Windows-based applications and websites
 Affiliate ProgramEarn referral commissions by promoting our services
 WordPress HostingFast & Reliable WordPress Hosting
 Domain TransferMigrate your existing domain seamlessly with zero downtime.
 All DomainsAccess 324+ top-level domains (TLDs) worldwide from a single platform
 Whois LookupIdentify the owner of any domain using our whois and rdap lookup tool
 Managed VPS Hosting
 AI Website BuilderCreate beautiful websites effortlessly using intuitive drag-and-drop features
 Online ShopLaunch a professional online shop with no technical skills required
 BlogDiscover expert guides on hosting, websites, SEO, and digital growth strategies
 ContactGet instant assistance via live chat or email
 SupportAccess help articles, tutorials, and service documentation
 SSL CertificatesEncrypt data, build trust, and boost SEO.
cPanel provides a simple dashboard for managing your website. You can manage your files, databases, and email accounts all from one place.
Pair it with WordPress, and you’ve got a setup for beginners and developers alike.
When you host WordPress on cPanel, your website’s files and database live on a server you manage through the cPanel interface. cPanel has been around for decades, most hosts support it, and the interface is consistent.
Learn it once, and you can use it anywhere. It also comes with WordPress-specific tools like Softaculous and WP Toolkit.
You’ve got two ways to install WordPress.
The automated path uses Softaculous, a one-click installer that handles files, database creation, and basic setup.
The manual path puts you in full control, though it takes longer since you build the database and configure everything yourself.
Prerequisites
Before you start, you need a few things ready:
- cPanel login credentials: Your hosting provider sends these when you sign up. You access cPanel by going to yourdomain.com/cpanel or through your hosting dashboard.
- An active domain pointing to your hosting account: Your domain’s nameservers should already be set to your host.
- PHP 7.4 or higher: Most modern hosts run PHP 8.x by default. You can check your PHP version in cPanel under Select PHP Version or MultiPHP Manager.
- An SSL certificate if you want HTTPS. Many hosts now include free SSL automatically. If yours doesn’t, you can install a free Let’s Encrypt certificate through cPanel.
Path A: Softaculous Auto Installer
Step 1: Access Softaculous
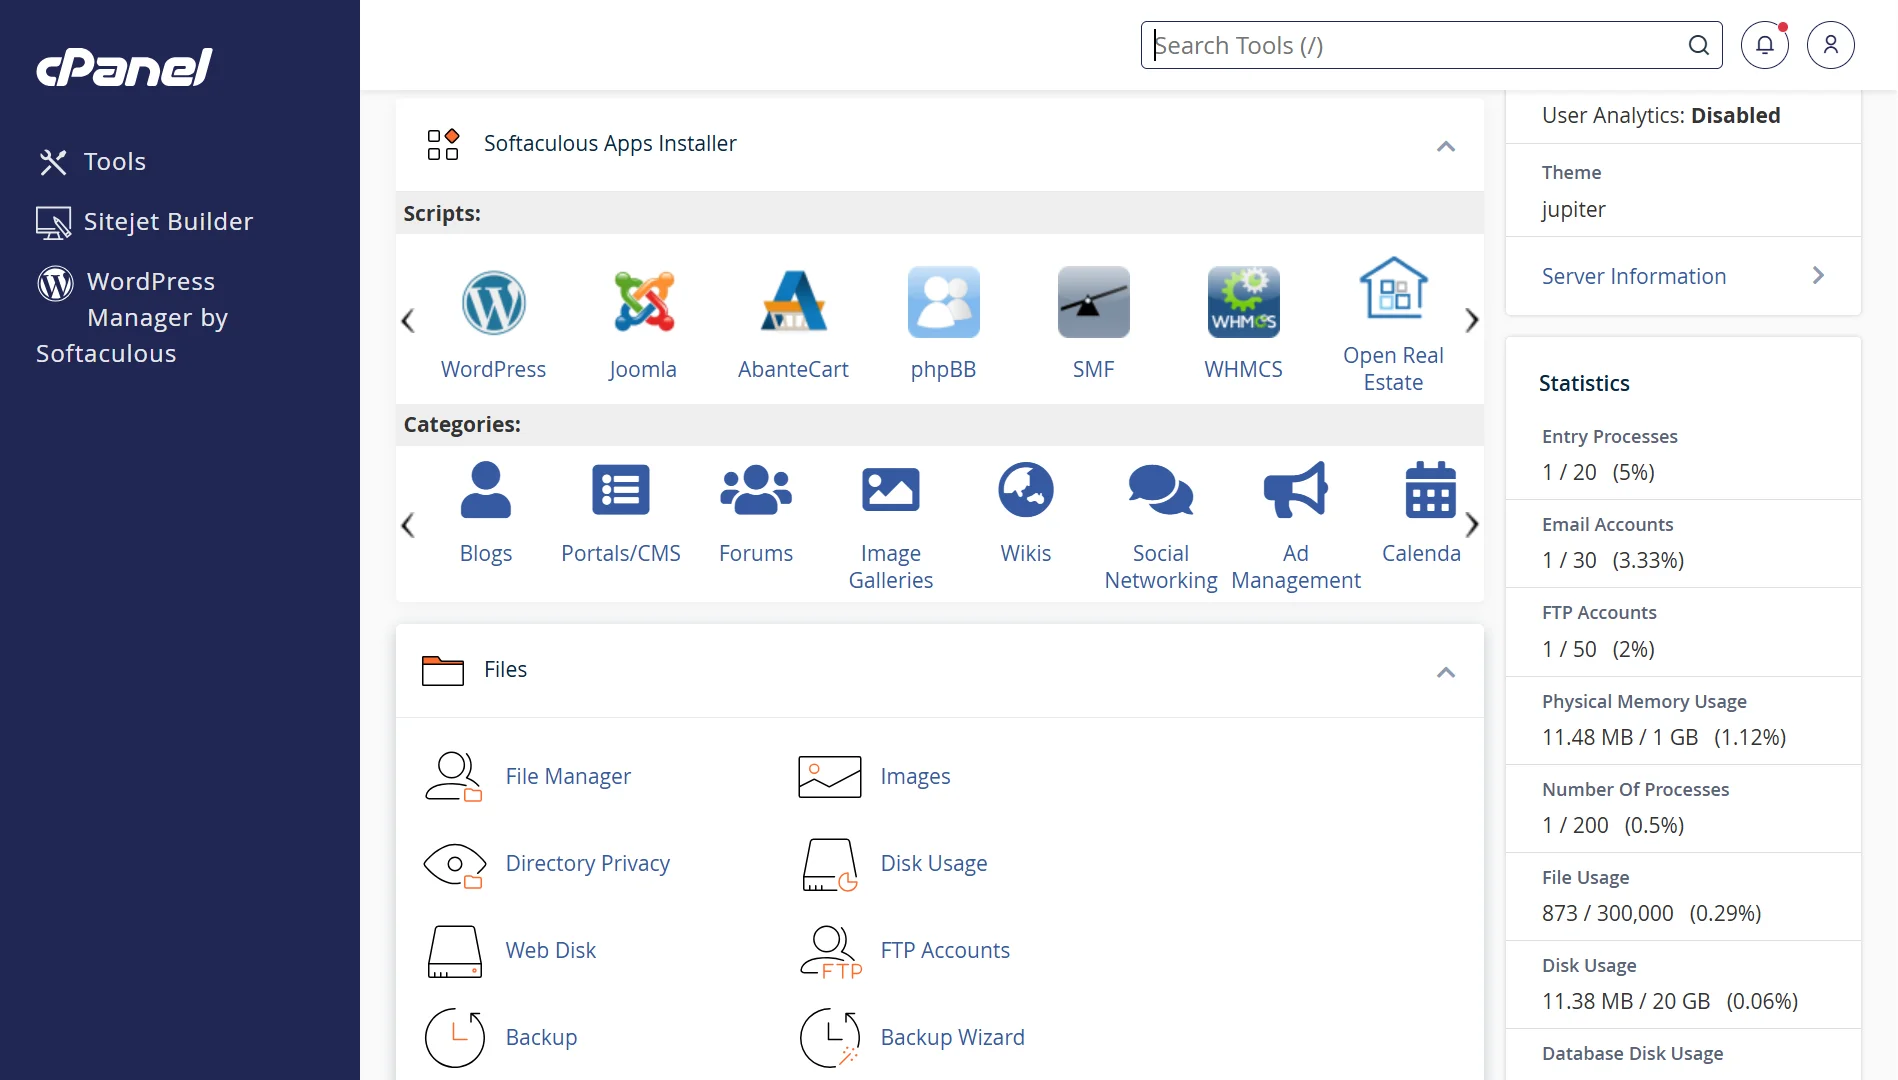
Log in to cPanel. You’ll find the Softaculous Apps Installer under the Software section of the dashboard.
Step 2: Select WordPress
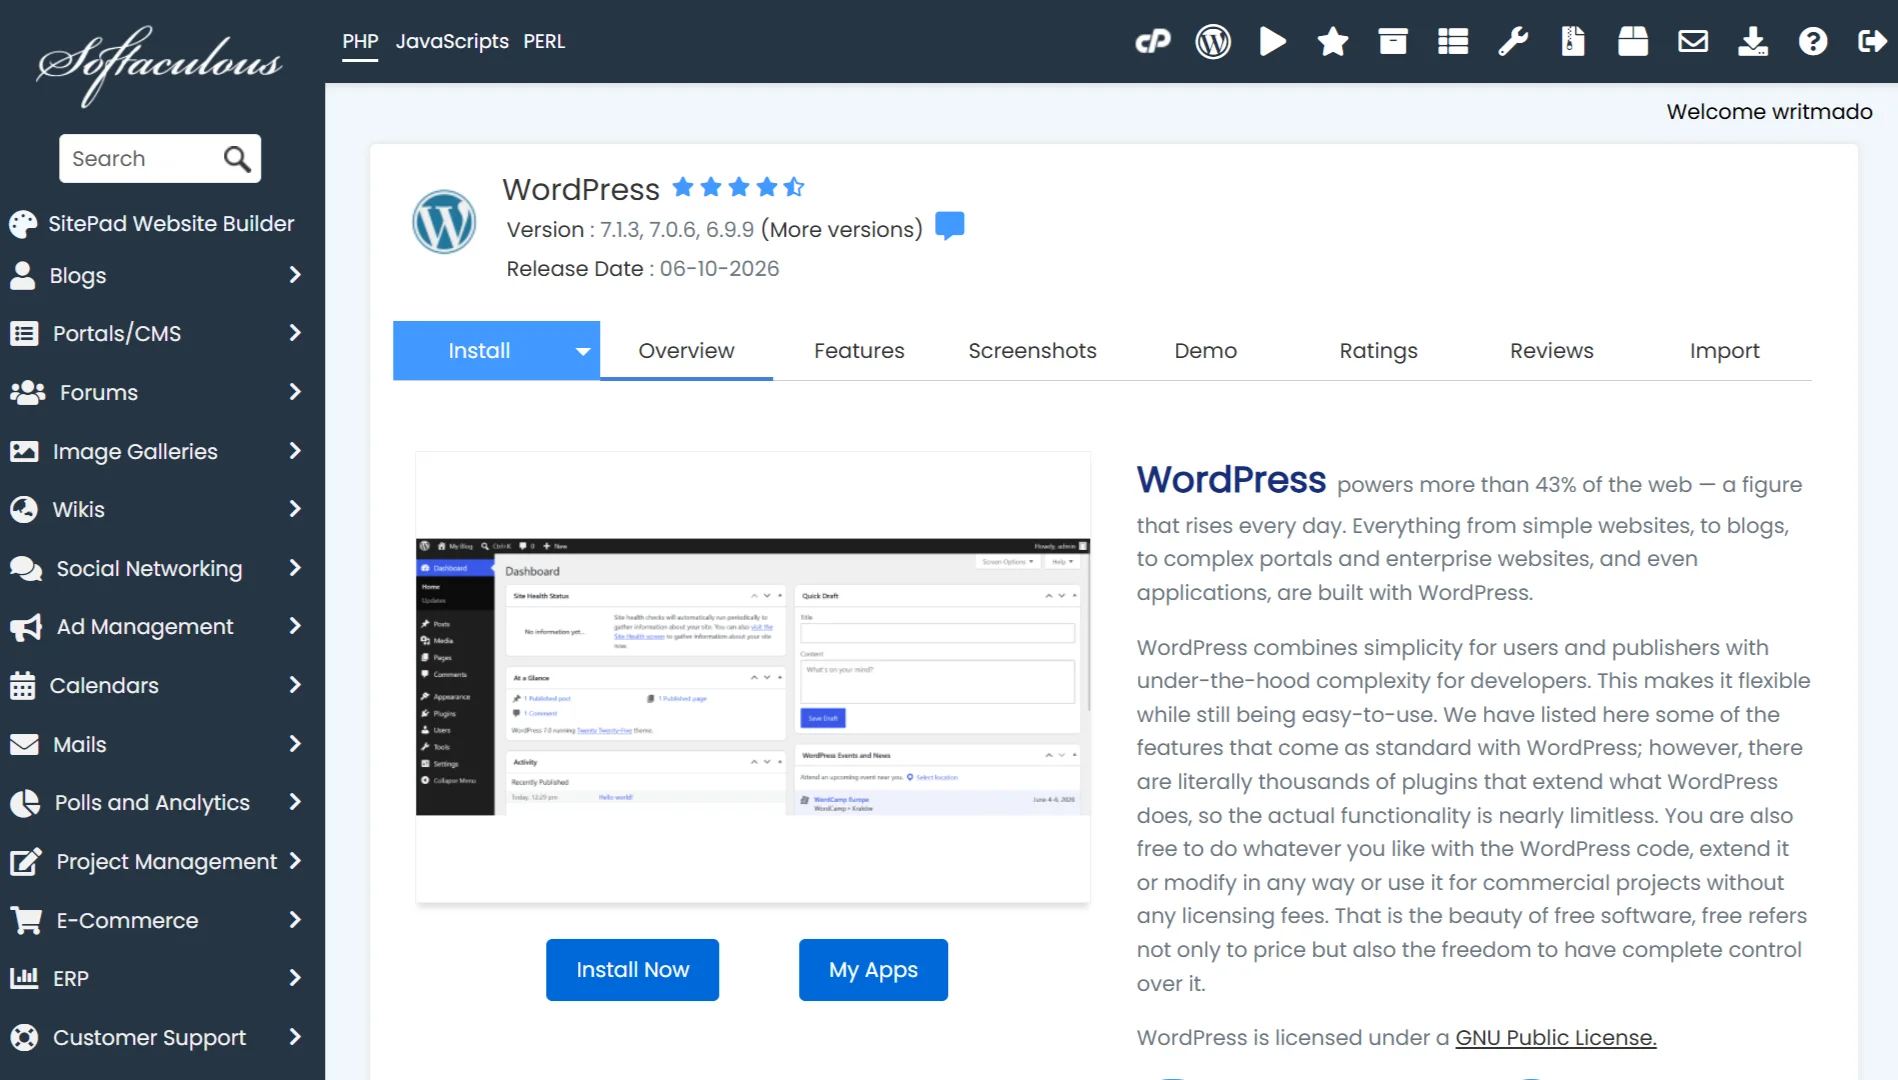
Softaculous shows a list of popular scripts on its homepage. WordPress usually appears in the Top Scripts section. Click the WordPress icon.
If you don’t see it, use the search box in the top right and type WordPress. Click the WordPress result, then click Install on the overview page.
Step 3: Configure Software Setup
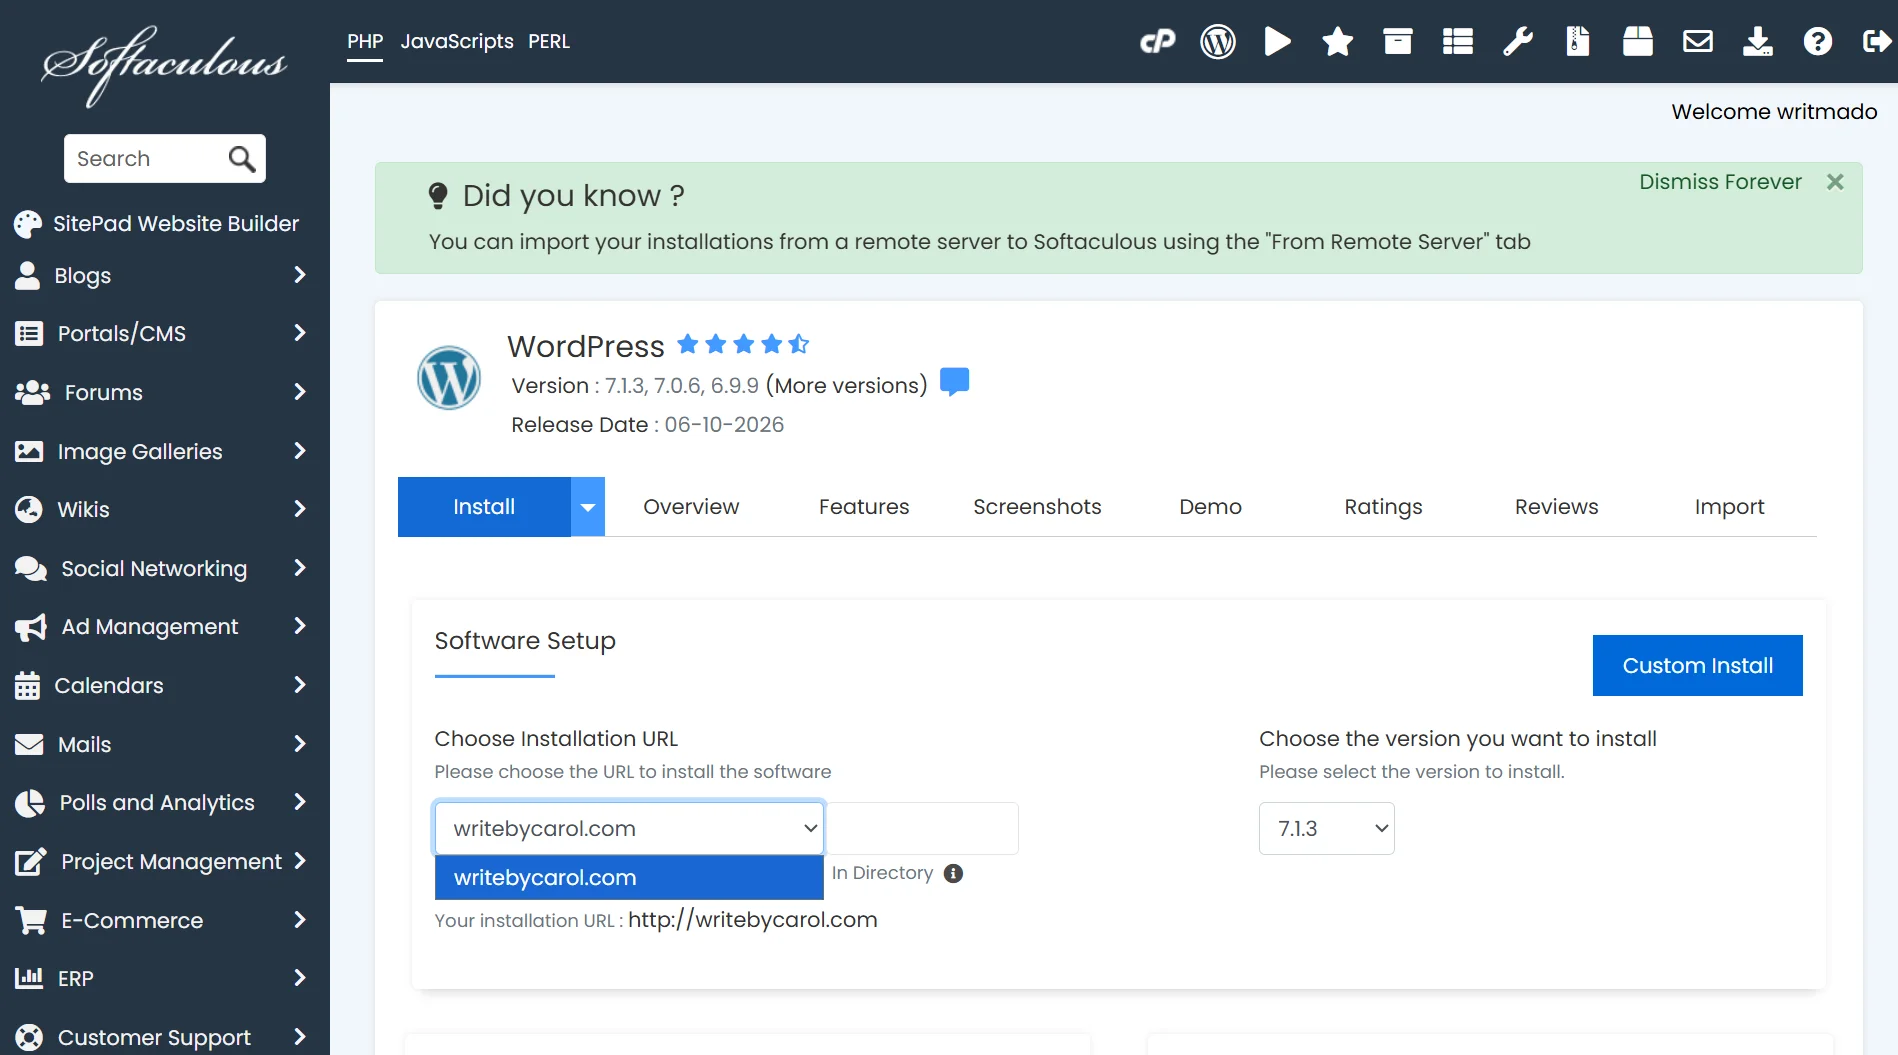
You’ll see a form with several options. Here’s what to fill in:
- Choose Protocol: Select https:// if your SSL certificate is active. This ensures your site loads securely. If you don’t have SSL yet, choose http:// and add SSL later.
- Choose Domain: Pick the domain where you want WordPress to live. The dropdown shows all domains connected to your cPanel account.
- In Directory: Leave this blank if you want WordPress at the root of your domain (
yourdomain.com). If you want it in a subfolder likeyourdomain.com/blog, type blog here. - Database Name: Softaculous creates this automatically. You usually don’t need to change it.
- Table Prefix: The default is wp_. You can change this for security, but the default works fine for most sites.
Step 4: Site Settings
Enter your Site Name and Site Description. These can be anything for now. You can change them later in WordPress settings.
If you plan to run multiple sites on one WordPress installation, check the Enable Multisite box. Most people leave this unchecked.
Step 5: Admin Account Configuration
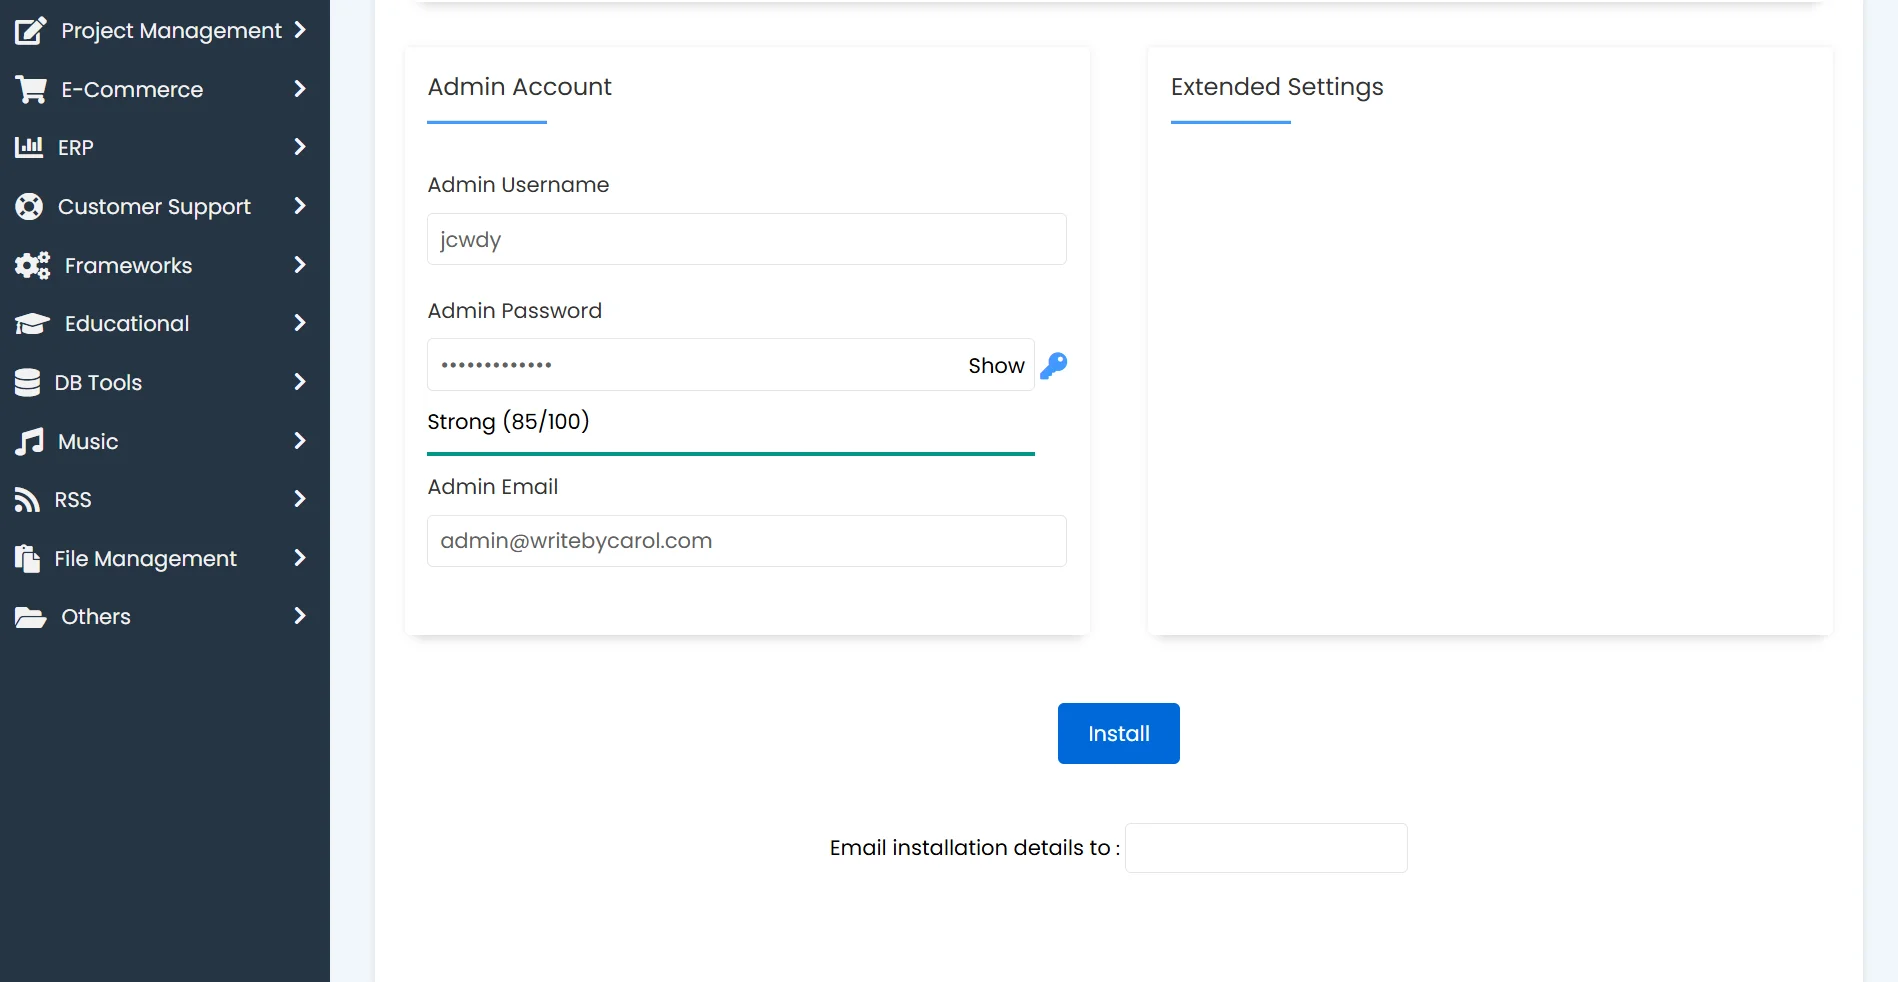
This creates your WordPress login:
- Admin Username: Don’t use “admin.” Choose something unique. Attackers often try “admin” first when attempting to break into WordPress sites.
- Admin Password: Use a strong password. Mix uppercase, lowercase, numbers, and symbols. Make it long.
- Admin Email: Enter a valid email address. WordPress uses this for password resets and notifications.
Step 6: Advanced Options (Optional)
Softaculous offers a few extras:
- Limit Login Attempts: Check this plugin to protect against brute-force attacks.
- Automated Backups: Enable this and set how often backups run. Daily backups with a rotation of 7 days is a reasonable setting.
- Choose Theme: Pick a default theme or leave it. You can change this after installation.
Step 7: Complete Installation
Click Install. Softaculous will create the database, upload files, and configure everything. This usually takes less than a minute.
When it finishes, you’ll see a confirmation with your site URL and admin URL. The admin URL is typically yourdomain.com/wp-admin. Save this link
Path B: Manual Installation (For Advanced Control)
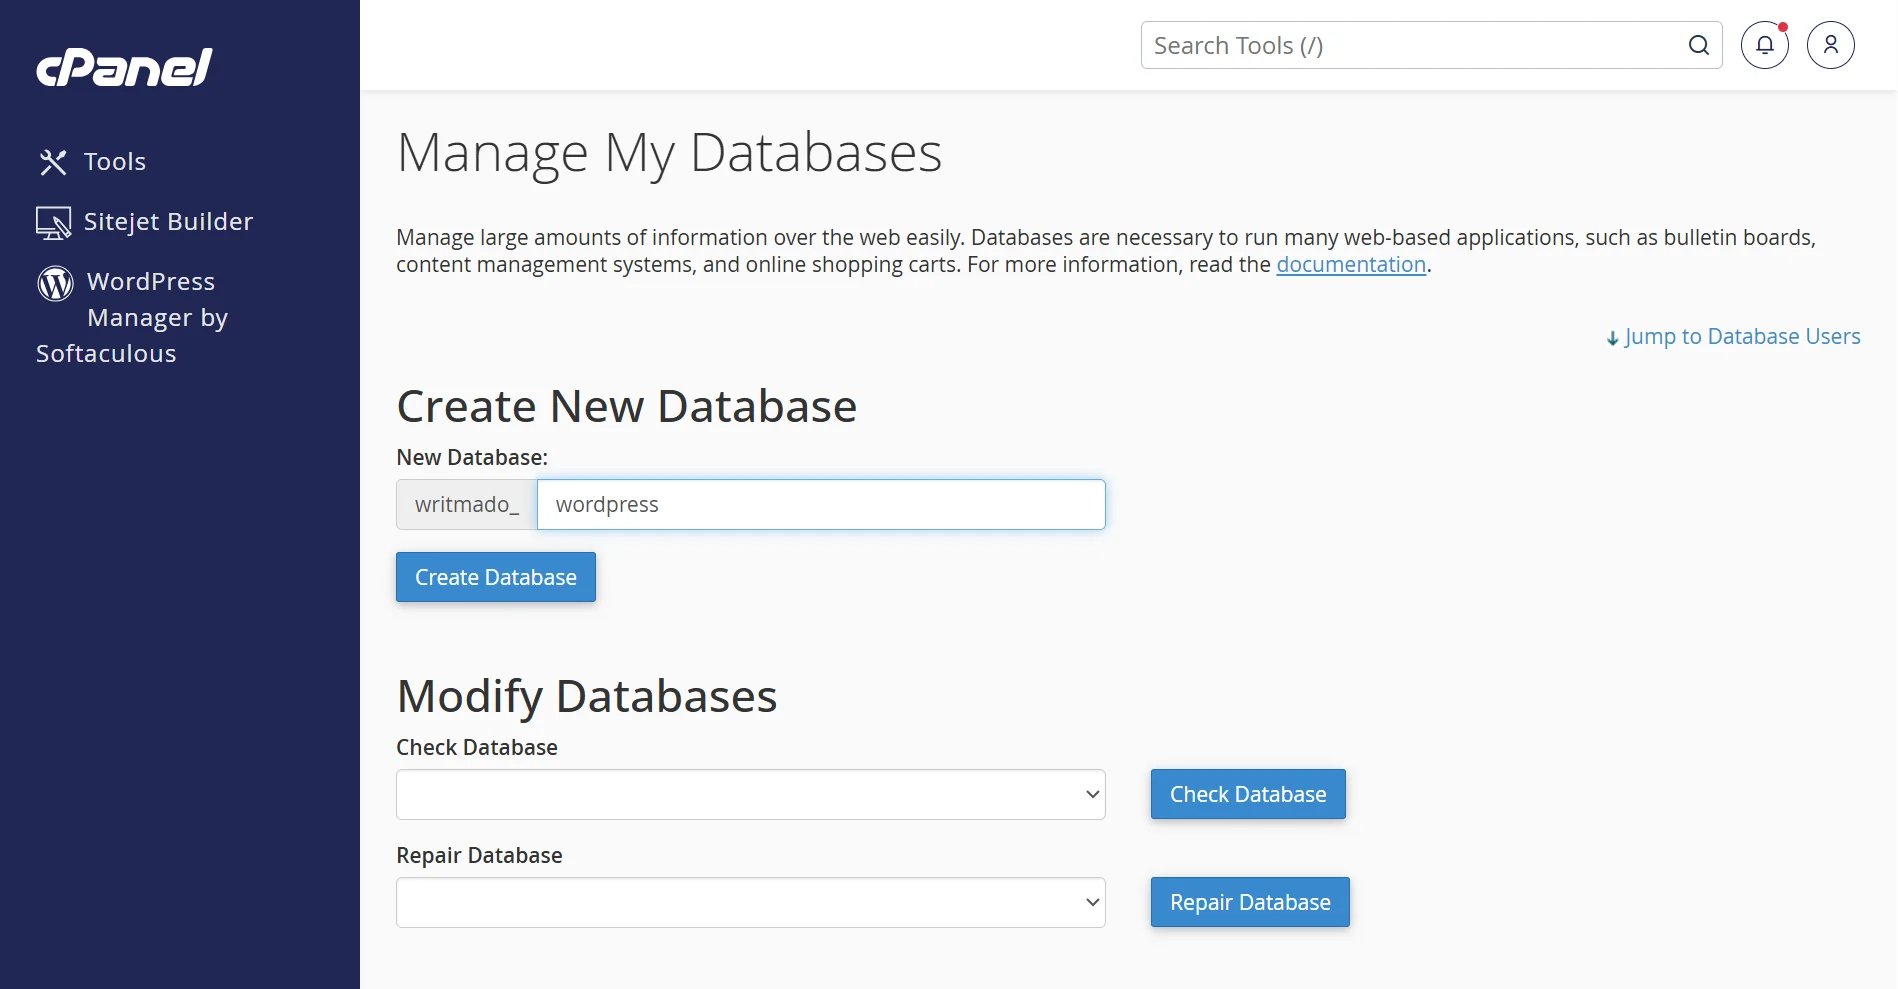
Step 1: Create MySQL Database
Go to cPanel and find MySQL Databases under the Databases section.
- Create a database: Enter a name. cPanel automatically adds your account prefix, so “wordpress” becomes “youruser_wordpress.”
- Create a database user: Enter a username and a strong password. Again, cPanel adds the prefix.
- Add user to database: Select the user and database you just created. Check All Privileges and click Make Changes.
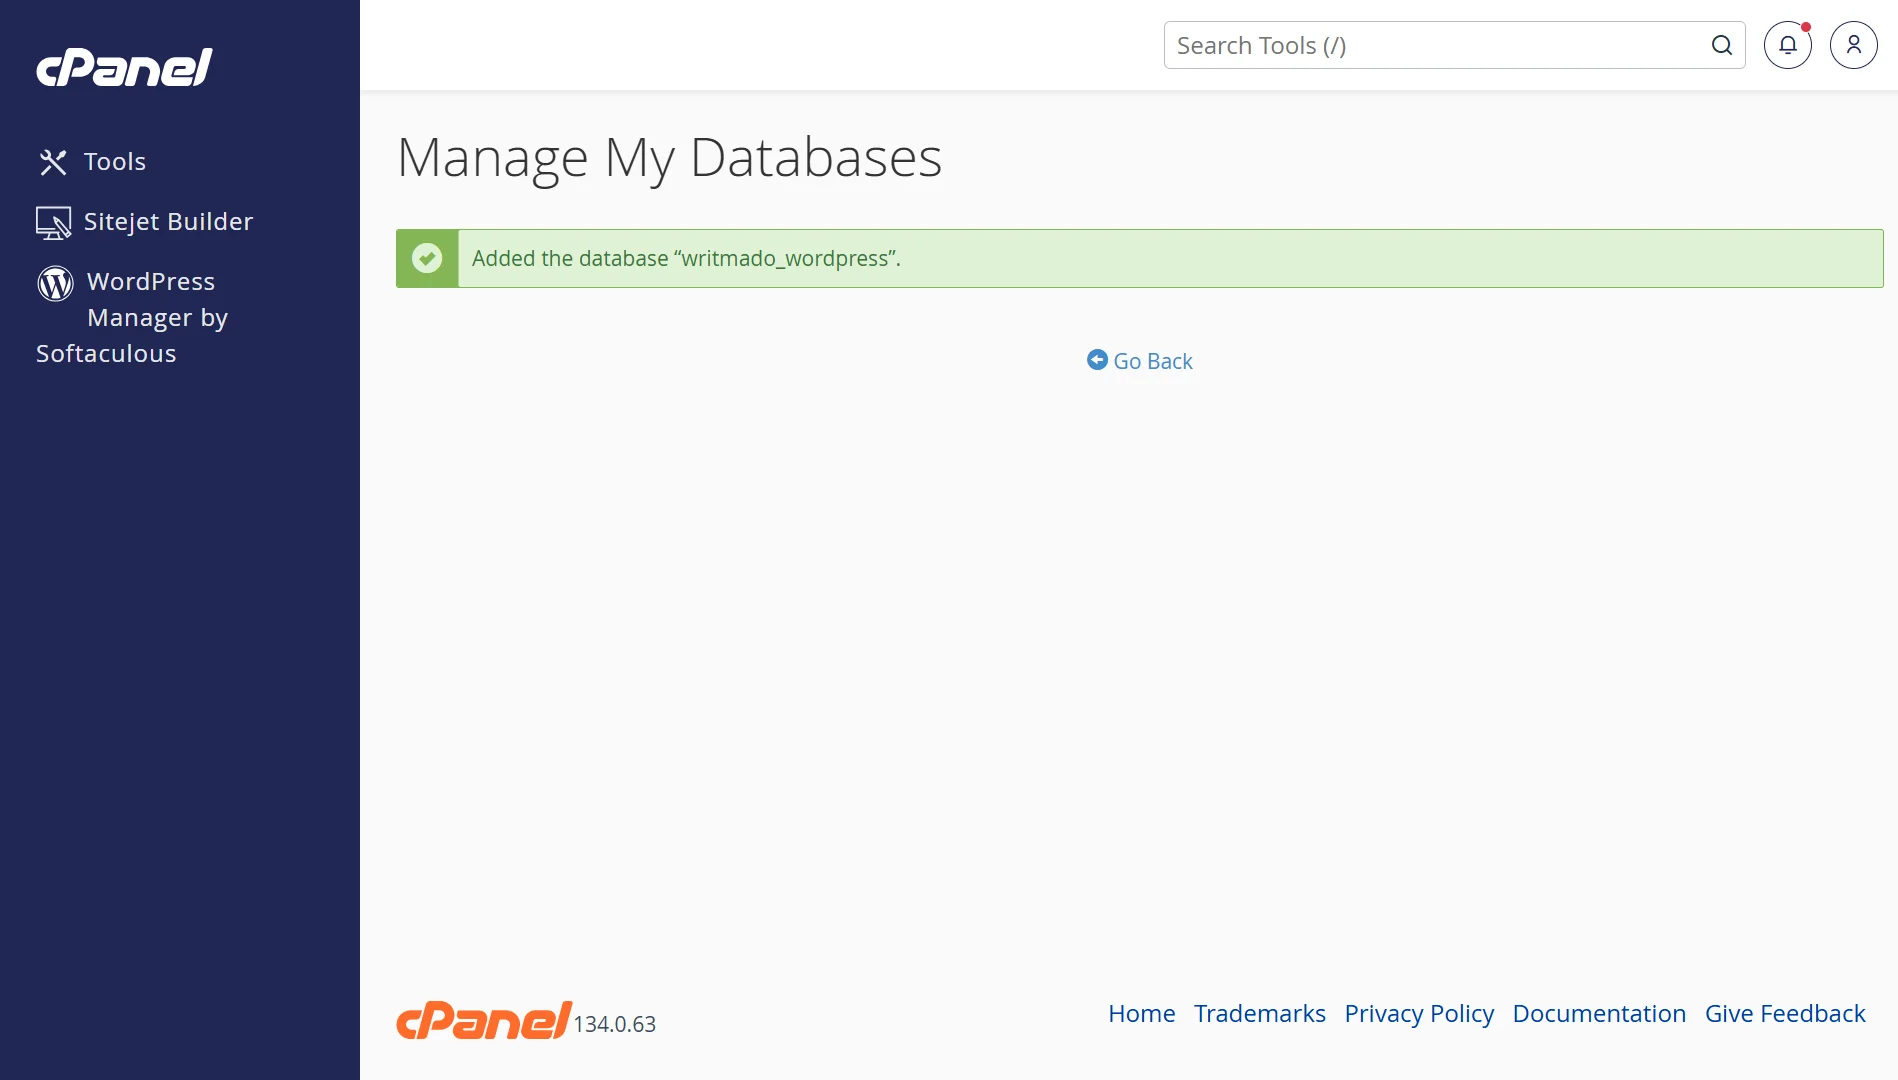
Write down the full database name, username, and password. You’ll need them in a moment.
Step 2: Download WordPress
Go to wordpress.org and download the latest version. You’ll get a ZIP file. Extract it on your computer.
Step 3: Upload WordPress Files
In cPanel, open File Manager under the Files section.
Navigate to public_html if you want WordPress at your main domain. For a subfolder, navigate there instead.
Click Upload and select the WordPress ZIP file. Once uploaded, right-click the ZIP and select Extract.
The extraction creates a “wordpress” folder. Open it, select all files inside, and move them to public_html (or your target directory). Then delete the empty wordpress folder and the ZIP archive
Step 4: Configure wp-config.php
In File Manager, find wp-config-sample.php in public_html. Right-click and copy it, then rename the copy to wp-config.php.
Right-click wp-config.php and select Edit. Replace the placeholder values:
- DB_NAME: Your full database name (with prefix)
- DB_USER: Your database username (with prefix)
- DB_PASSWORD: The password you set
- DB_HOST: Leave as localhost for most hosts
Scroll down to the security keys section. Go to the WordPress secret key generator (search “WordPress salt” to find it), copy the generated keys, and paste them into wp-config.php.
You can also change the $table_prefix from wp_ to something unique for security.
Step 5: Run Installation
Open your browser and visit your domain. You’ll see the WordPress installation screen.
Select your language and click Continue.
Enter your database details (name, username, password, host). These should match what you entered in wp-config.php. Click Submit.
On the next screen, fill in:
- Site Title
- Admin Username: Again, avoid “admin”
- Password: Use a strong one
- Admin Email
Leave “Search Engine Visibility” unchecked if you want search engines to index your site. Click Install WordPress.
Common Issues & Troubleshooting
| Issue | Fix |
| Database Connection Error | Check wp-config.php credentials; ensure user has All Privileges |
| White Screen of Death | Enable WP_DEBUG in wp-config.php; deactivate plugins/themes |
| Permission Denied | Set folders to 755, files to 644 |
| Softaculous Installation Failure | Check available MySQL database quota |
How to Host a WordPress Website on cPanel FAQs
What is the cheapest web hosting with cPanel?
cPanel hosting prices vary by provider and plan. Budget shared hosting starts at Truehost costs ₨282.65 per month.
What should I do immediately after installing WordPress?
Log in to your WordPress dashboard. Set your permalink structure (Settings > Permalinks). Install a caching plugin. Set up Google Analytics. Create a backup schedule. Change your admin password if you used a weak one. Install an SEO plugin like Yoast or Rank Math.
Is cPanel free or paid for hosting?
cPanel itself is commercial software. Hosting providers pay licensing fees based on how many accounts they host. For you as a customer, cPanel is included in your hosting plan’s price you don’t pay cPanel directly.
What are some good alternatives to cPanel?
Popular alternatives include DirectAdmin, Plesk, ISPmanager, and free options like Slate. Some hosts use custom control panels. The best choice depends on your technical comfort and hosting needs.
Ready to Host a WordPress Website on cPanel?
You’ve got the steps. Now you need a host that won’t slow you down.
Our web hosting plans include:
- Free SSL on every account
- File and database management via cPanel
- One-click install apps (WordPress, Joomla, and more)
- Zero setup fees, instant activation
- 24/7 WordPress expert support
And we have a variety of plans to choose from for every need.
Pick the cPanel plan that fits your needs. Every plan comes with pre-installed WordPress, LiteSpeed cache, daily backups, and a free domain for the first year.
You can get WebHosting Starter for ₨282.65/month, or WebHosting Pro for ₨296.78/month, or, WebHosting Unlimited for ₨4,149.77/month.
Plus, we give you a free domain for the first year, so you can get started without extra costs.
In addition, you get advanced protection and malware scanning on every account.
We run on enterprise-grade infrastructure, which means your website stays fast and reliable.
And because we’re optimized for Pakistan, your visitors get fast load times no matter where they are in the country.