Domain SearchInstantly check and register your perfect .pk or international domain
 Web HostingGet a .pk domain for as low as PKR 467
 cPanel HostingUser-friendly hosting powered by cPanel
 Reseller HostingLaunch your own hosting business with minimal technical requirements
 Windows HostingOptimized for Windows-based applications and websites
 Affiliate ProgramEarn referral commissions by promoting our services
 WordPress HostingFast & Reliable WordPress Hosting
 Domain TransferMigrate your existing domain seamlessly with zero downtime.
 All DomainsAccess 324+ top-level domains (TLDs) worldwide from a single platform
 Whois LookupIdentify the owner of any domain using our whois and rdap lookup tool
 Managed VPS Hosting
 AI Website BuilderCreate beautiful websites effortlessly using intuitive drag-and-drop features
 Online ShopLaunch a professional online shop with no technical skills required
 BlogDiscover expert guides on hosting, websites, SEO, and digital growth strategies
 ContactGet instant assistance via live chat or email
 SupportAccess help articles, tutorials, and service documentation
 SSL CertificatesEncrypt data, build trust, and boost SEO.
A dedicated server allows you to host several websites on one physical server instead of using a separate server for each site. This can reduce hosting costs while giving you more control over server resources and settings.
Hosting multiple websites is possible through virtual hosting, where the server identifies each domain and sends visitors to the correct website. Several websites can also share the same IP address. You can manage them using a control panel, set them up manually, or use containers. DNS, SSL, security, and resource management also need to be configured correctly for everything to run smoothly.
Three Ways to Host Multiple Websites
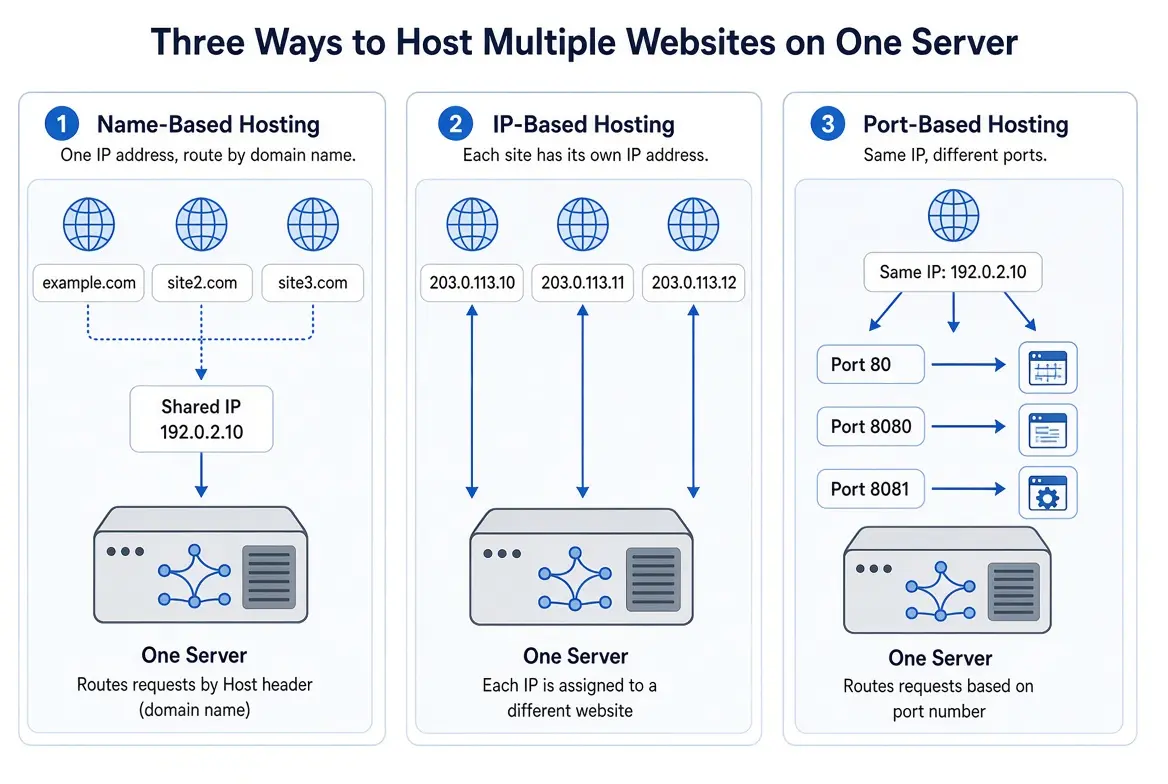
Name-Based Hosting
Name-based virtual hosting is the standard way most servers host multiple sites today.
- Several domains share one IP address.
- The server uses the domain name (sent in the HTTP Host header) to identify the correct website and serve the right content.
- This is the most common option, because it doesn’t require a dedicated IP per site.
- SNI (Server Name Indication) extends this to HTTPS by letting the browser tell the server which domain it wants during the SSL/TLS handshake, before encryption is fully established. This means different SSL certificates for different domains can share the same IP address, which wasn’t possible in the early days of SSL.
IP-Based Hosting
- Each website uses its own dedicated IP address.
- The web server figures out which site to serve based on which IP the request came in on, rather than the domain name.
- Useful for older systems that don’t support SNI, for licensing or compliance requirements that call for IP isolation, or for services like some legacy mail or FTP setups.
- It’s generally more expensive and harder to scale because available IPv4 addresses are limited and providers often charge per additional IP.
Port-Based Hosting
- Websites or applications use different ports on the same server and IP (e.g., example.com:8080, example.com:8081).
- Mostly useful for testing environments, APIs, internal dashboards, or staging versions of a site.
- Less practical for normal public websites, since visitors expect to reach a site on the standard ports (80/443) without typing a port number.
What You Need Before Starting
- A dedicated server with enough CPU, RAM, and storage to comfortably handle all the sites you plan to host, plus some headroom for traffic spikes and backups.
- An operating system and web server, such as a Linux distribution running Apache or NGINX (or both together, in some configurations).
- A management approach decided in advance: control panel, manual setup, or containers. This choice affects how you’ll add sites, issue certificates, and troubleshoot problems later, so it’s worth deciding before you start configuring anything.
- DNS pointed correctly: each domain’s A record (and AAAA record, if using IPv6) should point to your server’s IP address before you start configuring virtual hosts, so testing and SSL issuance go smoothly.
Method 1: Use a Control Panel
A control panel is one of the easiest ways to host multiple websites on the same server. Instead of managing everything through Linux commands, you get a web-based dashboard where you can add domains, create hosting accounts, manage files, configure DNS, install SSL certificates, and monitor resources.
This approach is especially useful if you manage several websites or client projects. You can keep each website in its own account or virtual host, which makes it easier to manage them separately.
Popular control panels
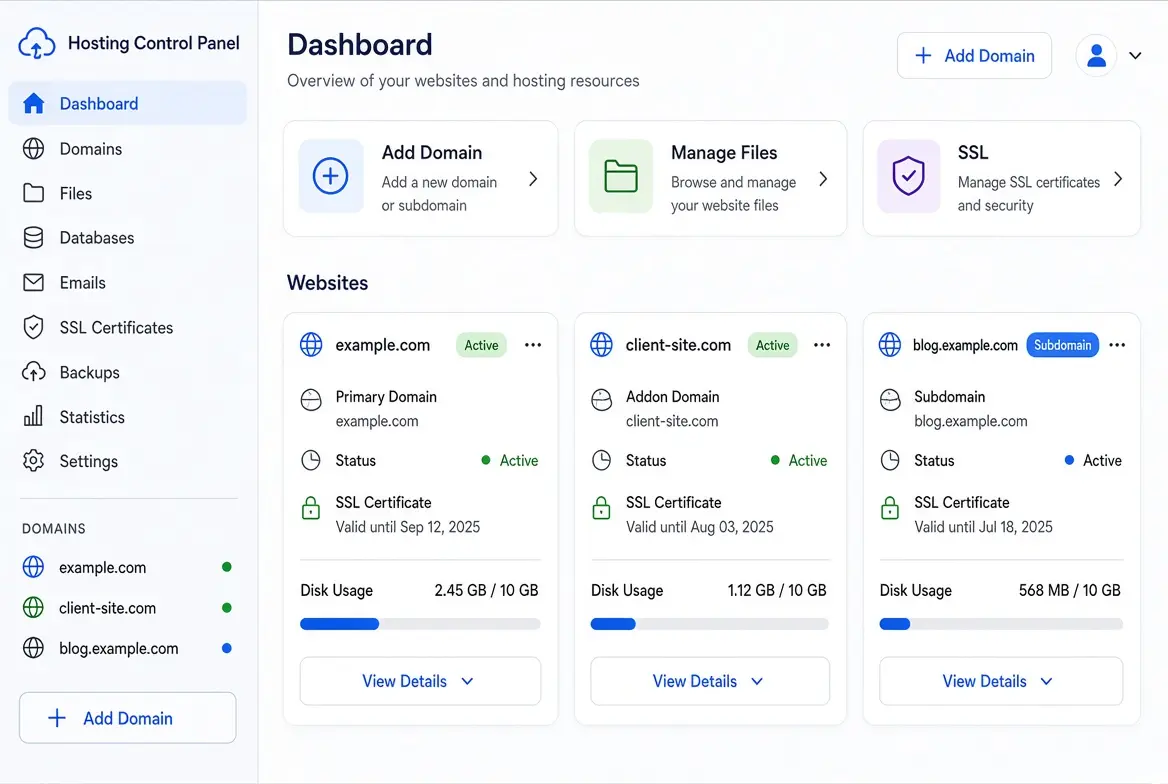
- cPanel/WHM: Lets you create hosting accounts, manage domains and subdomains, configure DNS zones, issue SSL certificates, and set per-account resource limits, all through a web interface.
- Plesk: Similar in purpose to cPanel, with support for managing multiple websites, domains, SSL certificates, and various applications (including some Windows-based hosting scenarios).
- Webmin/Virtualmin: A free, open-source option that’s a good fit for users who are comfortable with server administration but still want a graphical layer over manual configuration.
How the process works
Once the control panel is installed and your server is ready, you can add websites one at a time.
1) Add the domain
Start by adding the domain you want to host. Depending on the panel, this may be called a domain, website, virtual host, or hosting account.
For example, if you are hosting example.com, you would add that domain to the panel and specify where its website files should be stored.
2) Create the website or hosting account
The panel will create the directories and configuration needed for the website. Some panels allow you to create a separate hosting account for each site, while others let you manage several domains under one account.
Keeping websites separated is useful because each site can have its own files, databases, email accounts, SSL certificate, and resource limits.
3) Point the domain to your server
Your domain needs to know where the website is hosted. You normally do this by updating the domain’s DNS records.
For example, an A record can point the domain to your server’s IP address. If you use nameservers provided by your hosting company, you may instead change the domain’s nameservers.
After making the change, allow time for the DNS update to take effect. You should also confirm that the domain is pointing to the correct server before troubleshooting the website itself.
4.) Upload the website files
Once the domain is connected, upload its website files to the directory assigned to that domain.
You can usually do this through the control panel’s file manager, FTP/SFTP, or another deployment method such as Git. For a WordPress website, this is also where the WordPress files would be installed.
Each website should have its own document root so that its files do not get mixed up with those of another site.
5) Create databases if needed
Websites such as WordPress, Joomla, and many custom applications need a database.
From the control panel, you can usually create a database, database user, and password. You then connect the website to those database credentials during installation or configuration.
If you are hosting several websites, give each site its own database where practical. This keeps the sites separate and makes backups, migrations, and troubleshooting easier.
6) Set up SSL
An SSL certificate encrypts the connection between visitors and your website. Most modern control panels can automate SSL installation using Let’s Encrypt or another certificate provider.
Once SSL is active, your website should load using https:// rather than http://.
Check that the certificate covers the correct domain and that it renews automatically. An expired certificate can cause browser warnings and make the website appear unsafe to visitors.
7) Set resource limits
When several websites share one server, one busy website can consume a large amount of the available resources. This can slow down other sites or, in extreme cases, cause services to become unavailable.
Where the control panel supports it, set appropriate limits for each account. Depending on the server and panel, these may include:
- Disk space
- Bandwidth
- CPU usage
- Memory usage
- Number of processes
- Number of websites or domains
- Database resources
- Email storage
The exact controls vary between panels and hosting setups. A small business website, for example, may need far fewer resources than an online store receiving thousands of visitors.
8) Test each website
After setting everything up, open each domain in a browser and check that it loads correctly. Test the HTTPS version, forms, images, databases, email if configured, and any important application features.
Also check that each domain loads its own website rather than displaying another site’s files. This is particularly important when several domains are hosted on the same server.
Why use a control panel?
The main advantage is convenience. Instead of configuring every website manually, you can handle many common tasks from one interface. This can save time when adding new websites, creating accounts, installing SSL certificates, or managing DNS and databases.
The main drawback is that some control panels require additional server resources and may have licensing costs. You also need to keep the panel and its software updated because the panel becomes an important part of your server’s security.
For users who want to host multiple websites without managing every configuration file manually, a control panel can provide a practical middle ground between fully managed hosting and complete command-line administration.
Method 2: Set Up Websites Manually
If you want full control, or you’re managing a small number of sites and don’t need a graphical panel, you can manage everything through SSH.
- With Apache, you create a separate virtual host configuration file for each website, specifying its domain name, document root, and any site-specific settings.
- With NGINX, the equivalent is a server block for each website, defined in its own configuration file (or section) with the domain, root directory, and relevant directives.
Each site should have its own:
- Domain name (and any aliases, like a www subdomain)
- Website folder (document root)
- Configuration file
- Logs (access and error logs kept separate per site make troubleshooting and monitoring much easier)
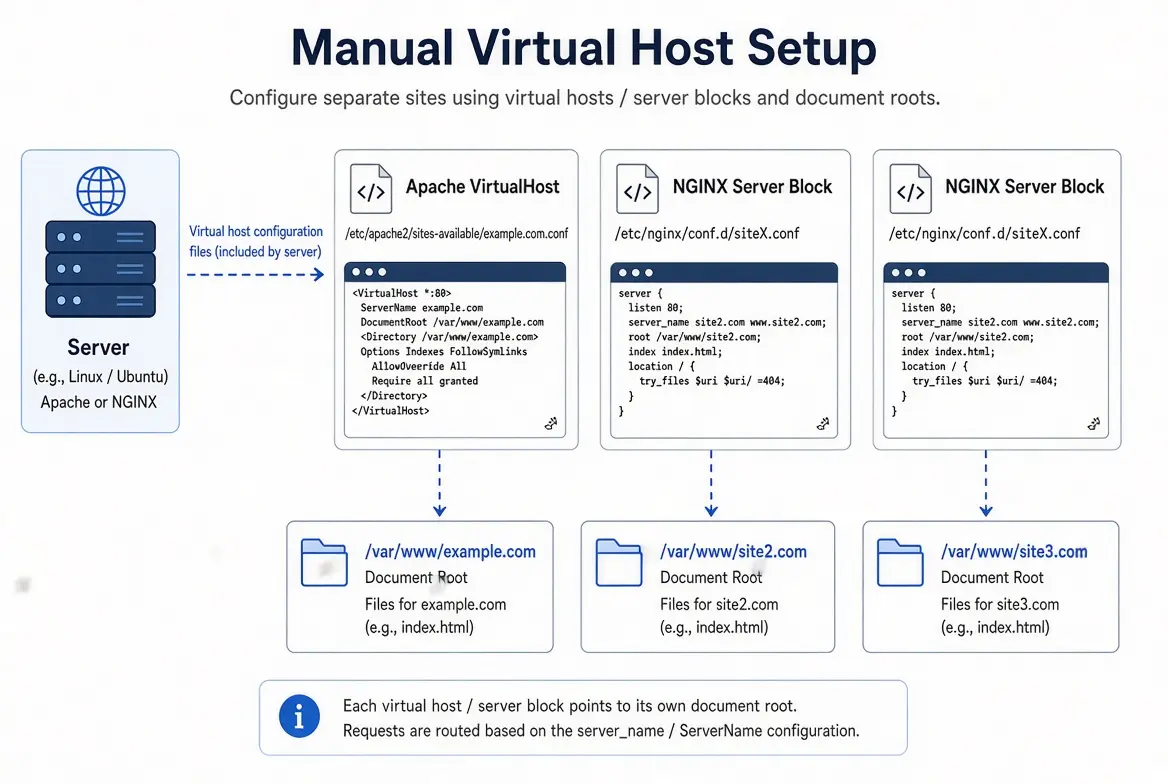
Common mistakes include incorrect domain settings in the configuration (typos, missing ServerName/server_name directives), wrong file permissions on the website folder (which can cause 403 errors), and forgetting to reload or restart the web server after making changes, so the new configuration never actually takes effect.
Method 3: Use Containers
Each website can run in its own Docker container, isolated from the others at the operating-system level.
- A reverse proxy, such as NGINX (or tools like Traefik or Caddy), sits in front of the containers and directs incoming visitors to the correct container based on the requested domain.
Benefits:
- Better separation between websites, since each container has its own isolated file system and dependencies.
- Different software versions for different sites, because each container can run its own stack (different PHP versions, different Node.js versions, etc.) without conflicts.
- Easier application management, including simpler updates, rollbacks, and the ability to move a site’s container to a different server with minimal changes.
The downside is that containers require more technical knowledge to set up and maintain properly, including familiarity with Docker networking, image management, and reverse proxy configuration.
Ready to Host Multiple Websites the Right Way?
Hosting multiple websites on a single dedicated server comes down to picking the right method for your needs, whether that’s name-based virtual hosting for simplicity, IP-based hosting for specific compatibility needs, or containers for cleaner isolation between sites. Whichever approach you choose, the foundation is the same: a dedicated server with enough CPU, RAM, and storage to handle your sites comfortably, along with proper DNS, SSL, and resource management to keep everything running smoothly.
The right server makes all the difference here. Trying to run several sites on underpowered hardware leads to slowdowns, resource conflicts, and headaches that no amount of clever configuration can fully fix. A dedicated server gives you the full resources and control needed to host multiple sites reliably, without sharing performance with other tenants the way you would on shared hosting.
If you’re ready to set this up on infrastructure built for it, Truehost’s dedicated servers give you the power, control, and flexibility to host multiple websites the right way, whether you’re managing everything through a control panel, setting it up manually, or running your sites in containers.
Host Multiple Websites on a Dedicated Server FAQs
How Many Websites Can Your Dedicated Server Actually Handle?
There’s no fixed number, it depends on each site’s traffic, the resources it needs (CPU, RAM, storage, database load), and how efficiently the server is configured. A server with modest specs might comfortably run dozens of small, low-traffic sites, while a handful of high-traffic sites could push the same hardware to its limits. Monitoring resource usage and setting per-site limits is the best way to know when you’re approaching capacity.
Do all websites need a separate IP address?
No. Thanks to name-based virtual hosting and SNI, most websites can share a single IP address, even when they each have their own SSL certificate. A separate IP is only needed in specific cases, such as supporting very old clients that don’t handle SNI, meeting certain compliance requirements, or running services that require IP-level isolation.
Can I host WordPress and other apps on the same server?
Yes. A dedicated server can run WordPress sites alongside other applications (custom PHP apps, static sites, Node.js apps, and so on), as long as the server has enough resources and each application is set up in its own virtual host, server block, or container. Using containers can make it easier to run apps with conflicting software requirements side by side.
What happens if one website gets hacked?
The impact depends on how well the sites are isolated. On a poorly separated manual setup, a compromised site could potentially be used to access other sites’ files or the wider server. With proper isolation, such as separate user accounts with restricted permissions in a control panel, or fully separate containers, a breach in one site is far less likely to spread to others. This is one of the main reasons isolation and permissions matter, not just convenience.
Do I need a control panel to manage multiple websites?
No, a control panel isn’t strictly necessary. It’s a convenience that simplifies tasks like adding domains, issuing SSL certificates, and setting resource limits through a graphical interface. Experienced administrators often manage everything manually through SSH, and some prefer containers for even more control, but both routes require more hands-on technical work than a control panel does.
Can two servers use the same public IP address?
Generally, no, a public IP address can only be actively used by one server (or device) at a time on the internet, since IP addresses are how internet traffic is routed. What’s possible is using the same IP address to host multiple websites on the same server via name-based hosting. If it looks like two separate servers are sharing an IP, it’s usually through a load balancer, failover setup, or similar arrangement that routes traffic to one server at a time rather than both truly using the IP simultaneously.
Common Mistakes When Hosting Multiple Websites
Forgetting to point DNS records to the server before testing or issuing SSL certificates.
Misconfiguring virtual hosts or server blocks (wrong domain name, wrong document root).
Not setting per-site resource limits, allowing one site to consume resources needed by others.
Skipping regular backups, especially before making server-wide configuration changes.
Reusing the same server credentials or user account across multiple sites, which increases the damage a single compromised site can do.
Forgetting to reload or restart the web server after configuration changes.
Letting SSL certificates expire by not setting up auto-renewal.